I know this is no fitness blog, but I like posting some personal stuff I want to share on. This blog is a quick tutorial for those who want to learn the newest moving photo trend on Instagram and Facebook that is the Plotagraph.
What is Plotagraph?
The revolution of art and photography as they say. It’s the trending app you might be seeing on your Facebook feed lately that makes an amazing moving photos with the subject being static. Take a look at this sample creation that I have made myself:
How To Use Plotagraph: Quick Tutorial
The final photo/video looks like it’s hard to make one, but really it is easy to make. The videos you might see on the internet might be a little complex to you, so I have made this simple version so you can jumpstart you way into creating your very first Plotagraph before making complicated ones:
Register and login
Go to plotagraphs.com and create an account. Registration is free (but you can go Pro when you’re ready) so nothing to worry about at the moment.
Note: Nope as of this time, Plotagraph is not available in iOS or Android. It’s a web-based desktop (thru browser) app.

Login and you’ll be at the homepage featuring the artist of the day. On the top left of the screen, click the home icon, the go to Plotagraph (Beta). This is the online version of the app. You may also choose to download the software by clicking Plotagraph Software (still requires an internet connection).

2. Create a new Plotograph
Scroll down and you’ll see the + icon in the middle of the screen. Click it then select New Plotograph. If a tutorial video displays, you can skip by pressing the X button on the bottom right of the screen.


Name your project (I named this one “Jeff Testing” haha!), and select your file from your computer, then click Create.

3. Crop your photo
Crop your photo if you’d like (optional). But if you plan to fit into the square proportions of Instagram, choose Square from the presets. Otherwise, you can choose any ratio that suits you.

4. Animate the areas with Animation Points.
To do this, click the Animation Points tool on the right, and then click Animation Points. Then drag a certain area of the photo you want to move to the direction of the movement, like drawing an arrow line on MS Paint. Check out the photo below with how I did it.

5. Add stabilizer points
Now surround the area you want to be static (stabilized) with red dots. Click again on the Animation Points tool, but this time choose Stabilizer Points. Then surround the area you want to stay put with the red dots by clicking on a specific area. The more detailed, the better.

6. Preview your animation & set animation time
Press spacebar on your keyboard and wait for it to get processed for a few seconds. If you’re not happy with the animation speed, adjust it at the Animation Properties at the bottom of the Animation Points tool. Then voila! You’ve made your very first Plotagraph!

7. Refine and preview again. Rinse and repeat.
You can add more animation points at stabilizer points after stopping the preview. Practice makes perfect so go ahead and go into detail. You can also choose to delete either points on the photo by choosing Delete Points on the Animation Points tool.

8. Export your project and you’re done!
Go to that tiny little arrow on the bottom right of the page. It is the Export Image button, which will bring you to this area on the image below. Simply choose Plotagraph (Custom Export will require Pro features, which is paid so don’t worry about it for now.)
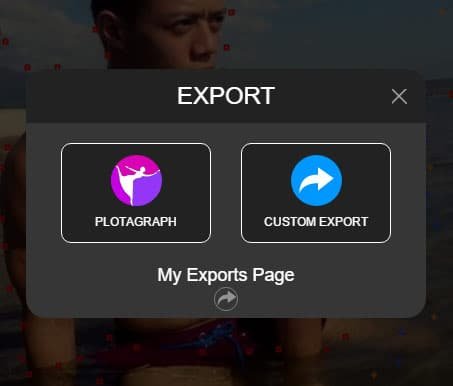
The process will take around a minute or two before the file becomes available for download. But once it’s ready, you can check it out and download at the My Exports Page, and the page like on the photo below will be displayed. With the free version, you get to export the file only in .mp4 format under 720p, 25frames per second and around 6.8 second loop length. You can choose between different file formats when you’re in Pro version of the app.

There you go! Your very first Plotograph is now ready for posting on your social media! Let me show you the final output of this project right here:
When you have more time, go ahead and explore other tools that comes with this amazing app. Be creative.
Plotographs Tutorial: Final Words
Plotagraph is having their social profile for each account by the way, please follow my works at https://www.plotagraphs.com/#!/profile/jeffalagar . Thanks and ciao!
 |